YOLO란 You Only Look Once의 약자로, 다른 모델들에 비해 빠를 처리속도를 보여 실시간으로 객체탐지가 가능하다.

SSD와 같이 하나의의 이미지 데이터를 여러개의 이미지 데이터로 나누어 분석하는것이 아닌, 전체의 이미지를 이용해 학습하고 예측하기 때문이다. (배경의 노이즈 부분에서 물체를 인식하는 오류가 발생할 확률이 낮음)
모델의 구조는 아래와 같다

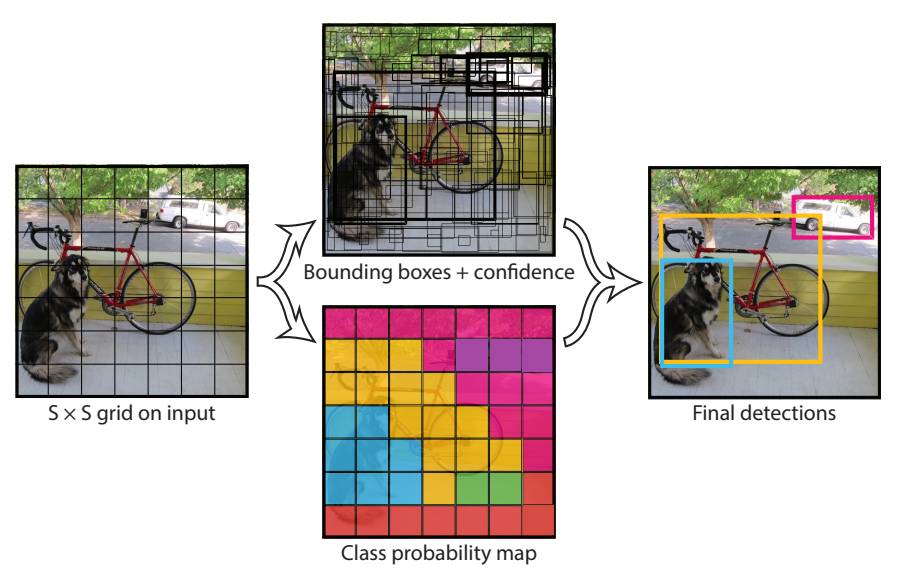
YOLO의 신경망은 확실히 SSD와 다르게 간단한 신경망으로 구성되어있는 모습을 볼 수 있다. 입력한 이미지 데이터는 7x7x30의 데이터로 변환된다.( 가로세로 7개의 격자로 나뉜 30개의 행렬 데이터. 격자로 구분된 셀을 그리드셀이라고 부른다. )

1. 하나의 이미지 데이터를 입력하면 물체들을 찾아 bounding box와 가장 높은 확률의 클래스를 찾는다.(중앙 상단)
2. 각 그리드셀에서 물체의 확률과 IOU값을 비교해 가장 높은 확률을 가진 클래스를 검출해 해당 그리드셀의 클래스를 확정(중앙 하단)
3. 확정된 클래스의 확률이 일정한 값( threshold )이상의 그리드셀을 이용해 bounding box를 그린다.( 우측 사진 )
import numpy as np
import cv2
from yolo.model.yolo_model import YOLO
import time

def process_image( img ) :
    ''' 이미지 리사이즈하고, 차원을 확장하는 함수.
    img  : 원본 이미지
    결과 : (416,416,3) 으로 프로세싱된 이미지 반환. '''

    image_org = cv2.resize(img, (416,416), interpolation = cv2.INTER_CUBIC)

    image_org = image_org / 255.0
    image_org = np.expand_dims(image_org, axis=0)

    return image_org

def get_classess(file):
    '''   클래스의 이름을 리스트로 가져온다.   '''
    with open(file) as f :
        name_of_class = f.readlines()

    name_of_class = [  class_name.strip() for class_name in name_of_class  ]

    return name_of_class


def box_draw(image, boxes, scores, classes, all_classes):
    '''
    image   : 오리지날 이미지
    boxes   : 물체의 박스 ( ndarray )
    scores  : 오브젝트의 클래스 정보 ( ndarray )
    classes : 오브젝트의 확률 ( ndarray )
    all_classes : 모든 클래스의 이름
    '''
    for box, score, cl in zip(boxes, scores, classes):
        x, y, w, h = box

        top = max(0, np.floor(x + 0.5).astype(int))
        left = max(0, np.floor(y + 0.5).astype(int))
        right = min(image.shape[1], np.floor(x + w + 0.5).astype(int))
        bottom = min(image.shape[0], np.floor(y + h + 0.5).astype(int))

        cv2.rectangle(image, (top, left), (right, bottom), (255, 0, 0), 2)
        cv2.putText(image, '{0} {1:.2f}'.format(all_classes[cl], score),
                    (top, left - 6),
                    cv2.FONT_HERSHEY_SIMPLEX,
                    0.6, (0, 0, 255), 1,
                    cv2.LINE_AA)

        print('class: {0}, score: {1:.2f}'.format(all_classes[cl], score))
        print('box coordinate x,y,w,h: {0}'.format(box))

    print()


def detect_image( image, yolo, all_classes ):
    '''
    image : 오리지날 이미지
    yolo  : 욜로 모델
    all_classes : 전체 클래스 이름

    변환된 이미지를 반환.
    '''
    pimage = process_image(image)

    image_boxes, image_classes, image_scores = yolo.predict(pimage, image.shape)

    if image_boxes is not None :
        box_draw( image, image_boxes, image_scores, image_classes, all_classes )

    return image

yolo = YOLO(0.6, 0.5)
all_classes = get_classess('yolo/data/coco_classes.txt')
print(all_classes)

image=cv2.imread('yolo/images/test/11.JPG')
cv2.imshow('origin',image)


start_time = time.time()
result_image = detect_image(image, yolo, all_classes)
end_time = time.time()

cv2.imshow('boxes',result_image)
print(end_time - start_time)

cv2.waitKey()
cv2.destroyAllWindows()
1. YOLO모델과 해당하는 클래스 목록을 가져온다.
2. detect_image함수를 호출해 process_image함수로 입력한 이미지의 크기를 조정한다.( 입력 데이터는 (416,416,3) 으로 변환. YOLO모델이 학습한 이미지 크기.)
3. 변환된 이미지 데이터를 YOLO모델을 이용해 물체 인식을 시행.
4. 출력된 bounding box에 사용될 데이터와 해당하는 클래스, 클래스의 확률을 출력.
5. box_draw함수로 이미지에 검출된 물체의 크기에 맞게 bounding box를 그리기.
참고 - pjreddie.com/darknet/yolo/
YOLO: Real-Time Object Detection
YOLO: Real-Time Object Detection You only look once (YOLO) is a state-of-the-art, real-time object detection system. On a Pascal Titan X it processes images at 30 FPS and has a mAP of 57.9% on COCO test-dev. Comparison to Other Detectors YOLOv3 is extremel
pjreddie.com
bkshin.tistory.com/entry/%EB%85%BC%EB%AC%B8-%EB%A6%AC%EB%B7%B0-YOLOYou-Only-Look-Once
논문 리뷰 - YOLO(You Only Look Once) 톺아보기
본 글은 YOLO 논문 전체를 번역 및 설명해놓은 글입니다. 크게 중요하지 않은 부분을 제외하고는 대부분의 글을 번역했고 필요하다면 부가적인 설명도 추가했습니다. 내용이 긴 섹션 끝에는 요약
bkshin.tistory.com
YOLO(You Only Look Once)란?
☞ 문서의 내용은 가장 하단 참고문헌 및 사이트를 참고하여 필자가 보기 쉽도록 정리한 내용입니다. ☞ 틀린 내용 및 저작권 관련 문의가 있는 경우 문의하시면 수정 및 삭제 조치하겠습
ctkim.tistory.com
'영상인식' 카테고리의 다른 글
| YOLO 두바이 운전 영상 객체인식 (0) | 2021.05.15 |
|---|---|
| TensorFlow Object Detection 환경구축 (0) | 2021.05.15 |
| SSD(Single Shot Multibox Detector)란 무엇인가 (0) | 2021.05.03 |
| TFOD( Tensorflow Object Detection ) (0) | 2021.05.03 |
| Semantic Segmentation( feat. E-net ) (2) | 2021.05.03 |